How to Cycle an Axolotl Aquarium
Cycling your tank is the single most important step in setting one up. It doesn’t matter what type of aquatic life you’re keeping — a stable, cycled environment is essential.
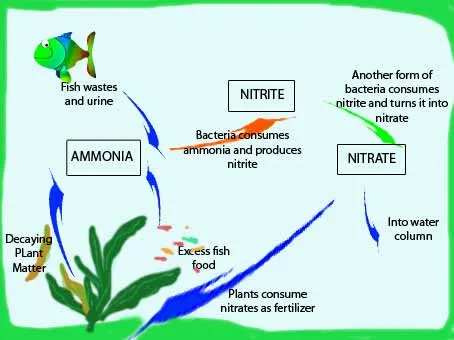
Fish waste and excretion release ammonia into the water, which is toxic. Bacteria in the filter media convert that ammonia into nitrite — which is actually even more toxic than ammonia. Fortunately, a second type of bacteria then consumes the nitrite and converts it into nitrate, which isn’t toxic at low levels. In short: ammonia (toxic) becomes nitrite (toxic), which becomes nitrate (non-toxic).
This is why cycling matters so much — it establishes the bacteria colony in your filter that will neutralise waste and keep the tank habitable, before your axolotl ever goes in.
How to Cycle Your Tank
Cycling an axolotl aquarium works the same way as cycling any other fish tank. There are two broad approaches: an older, slower method, and a much simpler modern one using bottled bacteria products.
New-Era Technology: A Foolproof Cycle
This modern approach is faster, more convenient, and in most cases more reliable (and saves you from reading the wall of text in the “old school” method below).
We recommend this method using two products, Prime and Stability (both by Seachem, available in our marketplace) — the instructions below are specific to those two. If you’re using different chemicals, follow their own labels instead.
1) Set up your aquarium and filtration system. Get your aquarium fully assembled and filled with everything you want in it — besides the axolotl, but including the water. A quick checklist (this may not match every setup exactly):
- Assemble the aquarium
- Add substrate
- Add water
- Add air stones, air pumps, etc.
- Add plants, rocks, etc.
- Add the filtration system (and/or protein skimmer)
2) Add Prime. Use 1 capful (5mL) per 200L (50 US gallons) of new water — for smaller volumes, each thread on the cap is roughly 1mL. It can be added directly to the aquarium, but works best added to new water first. Wait about 10 minutes to let it distribute evenly.
3) Add Stability. Use 1 capful (5mL) per 40L (10 US gallons) on the first day with a new aquarium, then 1 capful per 80L (20 US gallons) daily for 7 days. Fish (or your axolotl) can technically be introduced at any point, including immediately, though we’d recommend waiting at least 10 minutes — just keep dosing daily for the full 7 days. For ongoing biofilter support, use 1 capful per 80L (20 US gallons) monthly, at each water change, whenever introducing a new animal, or whenever medicating the tank.
4) Use test kits to monitor toxin levels (available in our marketplace). If you’ve followed the steps above, your tank should have an established, stable cycle. Test your water — if any reading is off, follow the guidance on the test kit.
- Ammonia: 0ppm (anything over 1ppm can kill your axolotl within days)
- Nitrite: 0ppm (just as deadly as ammonia at 1ppm or above)
- Nitrate: 20–40ppm (higher becomes toxic — regular water changes keep this in check)
- pH: roughly 6.8–7.8
The Old-School Way
There are two versions of the traditional cycling method: with fish, and without.
With Fish
1) Set up your aquarium and filtration system. As above — fully assembled and filled with everything except the fish. Checklist:
- Assemble the aquarium
- Add substrate
- Add water
- Add air stones, air pumps, etc.
- Add plants, rocks, etc.
- Add the filtration system (and/or protein skimmer)
2) Introduce a small number of hardy fish. The goal is to stock the tank with fish that produce waste but can tolerate the initial toxin spike long enough for bacteria to establish. Start with a small number of a known good cycling species — you can add more, or different fish, once bacteria levels build up. Since you’re setting this tank up for an axolotl rather than fish long-term, you’ll either need to rehome these fish once cycling is done, or choose small feeder-type fish your axolotl may eventually eat. Aim for roughly 1.5 fish per 10 gallons of water. A few solid choices:
- White clouds
- Zebra danios
- Goldfish
- Most minnows
- Most guppies
3) Feed sparingly. Don’t overfeed while cycling. As a rule of thumb, feed every other day, and only a moderate amount — nothing should be left over once the fish are done eating. This matters because:
- Fish that eat more produce more waste, pushing toxin levels up before the bacteria can keep pace.
- Leftover food rots and produces its own toxins.
4) Do frequent water changes. Every few days, replace about 10–25% of the tank’s water. Like reduced feeding, this keeps toxins from climbing too high before the bacteria have a chance to establish.
- Never use chlorinated water — it kills the beneficial bacteria and forces the cycle to restart. Treat tap water with a proper dechlorinator (available in our marketplace).
- Increase water-change frequency if you see signs of ammonia stress, but avoid shocking the fish with big swings in temperature or water chemistry.
5) Use test kits to monitor toxin levels (available in our marketplace). Once fish are in the tank, ammonia and nitrite will rise quickly as waste accumulates, then drop toward zero as beneficial bacteria establish — at which point it’s safe to add more fish. Testing daily is ideal, though every few days can work too.
- Keep ammonia below 0.5mg/L and nitrite below 1mg/L throughout — ideally under half those values. Increase water-change frequency if levels start climbing.
- The cycle is complete once ammonia and nitrite both read as good as undetectable (commonly called “zero,” even though it’s rarely mathematically exact).
- Many pet shops offer cheap or free water testing if you’d rather not buy your own kit yet.
6) Add more fish gradually once toxins are near zero. The full process typically takes six to eight weeks. Add just one or two new fish at a time so the added waste stays well within what the bacteria colony can handle.
- Wait at least a week after each addition, then retest before adding the next batch.
Without Fish
1) Assemble and prepare your tank, exactly as above, but without adding any fish at all — instead, you’ll add waste manually and monitor the water as the cycle develops.
- This method takes patience, since you’re waiting on decaying organic matter to produce waste on its own — but it’s often considered more humane, since no fish are exposed to ammonia or nitrite in the process.
2) Add a small sprinkle of fish flakes — about as much as you’d use for a normal feeding — then wait. Over the next few days, the flakes will decay and begin releasing ammonia into the water.
3) Test for ammonia after a few days. You’re aiming for at least 3ppm. If it’s lower, add a few more flakes and wait before testing again.
4) Keep ammonia around 3ppm. Test every other day. As bacteria establish and start consuming ammonia, levels will drop — top up with more flakes whenever it falls below 3ppm.
5) After a week, start testing for nitrite. As bacteria consume ammonia, they produce nitrite — less toxic than ammonia, but still harmful. Once nitrite shows up, the cycle has properly started; keep adding ammonia as before.
- You can test with a kit, or take a water sample to a pet shop.
6) Wait for nitrite to drop and nitrate to rise. As you keep feeding the bacteria ammonia, nitrite will climb — until enough bacteria establish to convert it into nitrate, the final, harmless product of the cycle. That transition signals the cycle is nearly complete.
- Watch for either a sudden drop in nitrite, a sudden rise in nitrate from a baseline of zero, or both — either confirms the cycle has finished.